Showing posts with label Decorating. Show all posts

Thursday, March 15, 2012

What have I been doing (Decorating edition)... dots and M in the living room!!!

I have had a couple people ask me if I made this "picture" or if I bought this... and of course, I made it!!  And I will tell you how... I took pictures at each step, but for some reasons only the first couple pictures showed up... I have no idea where the other pictures are!!!

The board is a wooden plaque with rounded edges that is sold by Uppercase Living.  It is a raw wood plaque and I picked up my best friend Oil Rubbed Bronze spray paint and spray painted that plaque and a wooden "M" that I bought at Hobby Lobby a long time ago.  While those were drying I took my Stampin' Up! 1-3/4" circle punch and punched out 10 circles of about 10 different designs of scrapbook paper.  Then I took my second best friend spray adhesive and started applying circles to the plaque.  I tried not to have any of the same design right next to each other...

After I let the circles dry, I used my "durable steel construction" straight edge and an exacto knife to cut the excess edges off...
Now here is where the pictures disappear so you have to use your imagination... I liked the way it looked with one layer of circles, but there was a lot of the oil rubbed bronze color coming out between the circles so the "M" having the same color didn't really pop.  So I decided to put another layer of circles covering the little triangles in between the circles (does that even make sense?!?!)

After I finished applying a whole lot of circles, I let the spray adhesive dry, then trimmed the excess edges again, then I applied a layer of matte Mod Podge over the circles.  After it dried, I used E6000 adhesive to apply the wooden "M".  

I LOVE it!!!!

Wednesday, March 14, 2012

What have I been doing (decorating edition)... dots in the bathroom, don't mind if I do!!

So (have you noticed I start almost every post with the word "so"... I didn't but somebody pointed that out to me the other day, I don't know why I do it, it just happens that way!!)

So, in the boys' bathroom, we have this little cabinet/shelf thingy that we bought like a million years ago at Target that hangs over the toilet.  It works perfectly to hold this and that and some toilet paper.  It has always bothered me that the doors are made of clear glass because you can see everything in there... see...

Well the other day I decided I just couldn't take it any longer, I had to do something to cover up the boys' "beauty products".  So I set out to the fabric store and the craft store and the other craft store and then to Target, and still couldn't find ANYTHING to work.  So I ventured down to the basement to my collection of scrapbooking supplies and lo and behold I found some old Stampin' Up! paper that matched the shower curtain and wall colors PERFECTLY!!

I took the glass out of the doors and just used a standard spray adhesive that said that it would adhere glass and paper and adhered the paper, then used an exacto blade to trim off the excess then slapped the glass back in place.  
I LOVE IT!!!  It looks very cool!  And better than that... it was FREE!!!

Tuesday, March 13, 2012

What have I been doing (decorating edition)... wall gallery!!!

So this is one of the walls of our living room.  It is LONG and BLANK!! The wall across the room is a wall of almost all windows so I needed something BIG to fill this wall.  (As a side note, please excuse the mess on the side table and the ottoman (I took this picture on a weekend where the hubby was working from home so that's all his stuff spread all over!)) <-- I think I have a parentheses problem!!  Anyway back to the wall...

I searched high and I searched low for a LARGE wall gallery that would work there.  After A LOT of searching and pinning, I finally found this gallery wall idea from (of all places) the HP website.

So I went through all of the old frames and pictures and mirrors, etc. that I had laying around and came up with as similar in size as I could to this gallery wall drawing.  I measured each frame, picture, etc. as well as the wall and using my Type A personality traits I created a graph so I could lay out everything and make sure it all fit...

Then I laid out all the frames, etc. on the floor and as you can see in the picture below, they are all of different finishes, so I grabbed my Rustoleum Oil Rubbed Bronze Spray Paint and went to town spraypainting all the frames to match so they would all coordinate.

Then I drew all the shapes of the frames, etc. onto some old packing paper that I had and taped it all up on the wall to see what it would look like...

And here is the finished project...  I absolutely LOVE it!  I just need to paint the vent the same color as the wall so it will blend in and not stick out!
I apologize for the horrible picture, remember on the opposite wall is a wall of windows so the light shines directly in and it created glares on a lot of the pictures, but trust me, it looks good!!!

Monday, March 12, 2012

What have I been doing (home improvement/decorating edition)... 1/2 bathroom fixtures

So you may remember on an earlier post, I talked about painting our 1/2 bathroom a soft gray color and spray painting some accessories and picture frames in an oil rubbed bronze color.  I got all the accessories put in and it looked fabulous with one exception...

In case you are not familiar with what that "lovely" thing is... it is a builder's grade faucet in shiny chrome from the very early 2000's.  I decided to change that bad boy out.  This makes the 5th faucet I have replaced and honestly, this is one of the easiest home improvement projects that ANYONE can do!!  I did take step-by-step pictures, but somehow they are gone off my camera, so you don't get instructions.  I apologize!!!!

Everything you need comes with faucet in the box... even very nice and easy to follow instructions!!

The first step (after turning off the water to the faucet obviously!) is to remove the old faucet.  Now just be ready!!  If you are at all like me and have lived in your home for 10 years and have a 7 year old boy and a 4 year old boy and this is the bathroom that they always use to wash their hands when they come in after playing, it will be yucky... like this...

Do you see that dirt ring??  Gross!!  Here's what it looks like after being scrubbed with Clorox wipes...
 Much better!!!

And here is the after picture with some of the spray painted accessories (they both used to be shiny chrome).
LOVE IT!!!!

Then I had to change out the hinges and the handles for the vanity... here are the old ones...

and here's the after...


**Sorry these are not the best pictures... the bathroom is TINY and there is no window anywhere close so the lighting is just horrible!!!

What have I been doing (decorating edition)... hooks and more hooks!!

Ok, so there are some background things you need to know before I jump into the hook projects!!

1) I used to be an Uppercase Living consultant.  Right before I ended my consultant-ship (is that a word?!?!?) I went through and bought a whole bunch of random vinyl sayings and other things with my discount that I thought I might someday put up.  Let's just say I have a ton of vinyl, if I wanted to cover my whole house in vinyl, it's possible I have plenty!!!

2) I lose my car keys on an almost daily basis, usually when we are running late to get my 7 year old to school.  I just throw them down on the cabinet beside my purse and without fail they get lost!  I once had to have my neighbor pick up my 4 year old at preschool because I had lost my keys only to find them in the silverware drawer about 5 minutes after she dropped him off.  The drawer must have been opened and they must have fallen in... I don't know!!!! We have lived in our house for 10 years and this has been going on for 10 years!!

3) My husband believes that I am incapable of hanging his dress shirts up properly!  He buys the wrinkle-free ones because it's possible that I refuse to iron for him, but the problem with the wrinkle-free is that you have to take them directly from the drawer and hang them up "the right way" (which I apparently haven't learned in my 34 years on Earth)!  In the 10 years, we have lived in this house, every week while doing laundry I've said, "I really should put some hooks in here to hang the hubby's shirts on as soon as I pull them out of the dryer!"

Can you see where I'm going with all this?!?!?  I bet so!!!!

 These are the hooks I bought at Target... they are even called a key rail!  How awesome is that????
 And here is the key rail hanging on the wall right beside the entrance to the garage... notice my keys on the far right hook?!?!?


Then I looked through all my vinyl (and I'm not talking my record collection!!) and found this one which just totally cracks me up... yes I have THAT kind of sense of humor!!

Then I found this little plaque thing that comes with 4 hooks (all also from Uppercase Living)! And I did the whole vinyl application and came up with this...

And here it is hanging up in my itsy-bitsy teeny-tiny laundry room!  I love it!  I snicker everytime I walk into the laundry room!!

And here it is right after I did my laundry for the week... serving their purpose!!!

Wednesday, February 1, 2012

Candlestick-y things...

So my neighbor used to be a consultant for Southern Living at Home.  She recently decided to end her consultant-ship (is that a word?), and was selling off all her inventory on hand at rock-bottom prices, so I bought a few things from her like two of these candlestick-y things...
 
 So, when I got them from my neighbor, I really liked the color, but then I placed them in my living room and I decided I didn't really like the color anymore.  So, I decided to spray paint them!!  The glass "jar" part is permanently attached to to the base.  Step 1: tape off the glass so no paint gets on it...
 Next: Cover the top of the glass with wax paper and tape it down securely so paint won't get inside the "jar".
The next step is to sand off all the current paint and rough up the base so the spray paint will stick to it... in this picture you can see the difference... the one on the left has been sanded, the one on the right has not yet been sanded...
The next step is to spraypaint... my only question was, "what color?"  I debated for a long time and then because our living room is a pretty dark grayish-green and our furniture is chocolate brown, and we have a white fireplace and white trim and white blinds...
So I decided to paint them white to bring some of the white off the walls into the center of the room...
 I used Rustoleum White Satin and a Rustoleum Matte Clear coat.
I decided to fill it with some orange-y pebbles that I had stored in my guestroom closet until last week!!  I will probably also get some candles to go in there too, but I didn't have any of those laying around...
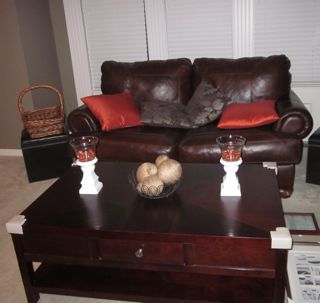
 Here's what they look like on the coffee table in front of the love seat!  I LUVVVV them!!!


Monday, January 30, 2012

A Quick Decorating Project...

I realized that I have never blogged about re-painting the main floor 1/2 bath.  About ummmm... 8 years ago I think, I found the directions for this beautiful faux finish.  I used a dark green, a light green, a white and a metallic copper paint sponged on the entire wall.  It sounds weird and this picture does not do it
 justice, but it was really pretty.  The room is pretty small with no windows, so very dark (that's why the picture is so bad).  Because the room is so dark and the overall tone of the paint was so dark, the room seemed TINY!!!

So I decided to paint it a soft grey color, and it turned out so pretty!!!  And the room looks HUGE now!!  Here is a picture of the wall color.  The shelves there are a CD stand that I bought 8 years ago at Pier 1.  It used to be silver, but I spray painted it oil rubbed bronze so it would pop a bit against the grey color.  The silver just blended in.  I got this idea to use the CD stand for shelves from a friend and neighbor!  The shelves are the perfect size for toilet paper rolls and rolled towels and a vase on top!!

Ok, so now to the art project.  When cleaning out my cabinets for the cabinet refinishing project, I found this little basket thingy.  I think it was a wedding gift that came with a casserole dish.  I found it in the cabinet above the fridge, I don't think I have EVER used it for anything before so I decided it would work perfectly as a little decorative "tray" to sit on the back of the toilet in the 1/2 bathroom.
So, I spray painted it with the same oil rubbed bronze spray paint that I painted the CD shelves.  I did 2 coats of the bronze and then a coat of a clear matte finish layer, and here's what we ended up with...
I love the way it turned out.  I haven't quite decided what to fill it with, but right now it has 2 rolled towels that I had previously.  I haven't quite decided what color scheme I'm going to go with...
Although I did find this color scheme on Pinterest, and I love it so I think I'm going to use this for the 1/2 bath, but you know it's always up for discussion.
Source: http://design-seeds.com/index.php/home/entry/feathered-brights2

I figure the walls are the top color and the oil rubbed bronze is pretty close to the bottom color and the old towels I have are pretty close to the 2nd color, so we are already over halfway there!!!

I'd love to hear what you think about this color combination...

Friday, January 27, 2012

What I've been doing lately...

Well I think in the last 2 days, I have had 4 different people ask me if I was ever going to blog again!  I was pleasantly surprised (and happy!).  I didn't realize that anyone really cared all that much about what kinds of crafty things I've been doing and what kinds of books I've been reading, but I guess there are a few who do, so I'll come back!!!

Ok, so what have I been doing??  Ok this little "story" has many steps that all inter-relate so I will try to keep it brief!!  We used to store all our luggage under our master bed, but it was really crowded under there, and our bed is really tall so when you walked in the room you could see some of the stuff under the bed and no matter how nicely and neatly organized the luggage was, it still just looked junky, so I started looking for a new place to put all the luggage.  I came up with the guestroom closet.  Perfect!!!  Right?!?!?!

Well the guestroom and it's closet were completely full of supplies for different projects that I am either in the middle of or planning to do (the husband calls it my staging area!).  So in order to get the luggage into the closet, I had to clean out the guestroom.  This whole process took about a week!  I took about 4 rubbermaids full of stuff to Goodwill (mostly old kids clothes, etc.).  Then I had to find a place for all my project supplies, so the only room currently not really being used in our house was the dining room, so I moved everything from the guestroom to the dining room.  This took about a week!!

So here are the pictures for this fun project...  The first is the current view under our bed... it's empty and clean!!!
 This is the picture of our guestroom closet... see all the luggage??
 And I really can't believe I am showing you this picture, but this is the current state of my dining room table, with all my projects in process and waiting to start on just hanging out on the table!!


Alright, let's move on to books!!  I just finished reading this book...
 It was fabulous as all of Adriana Trigiani's books are... I highly recommend them if you are looking for something medium to read (by medium I mean, not light and fluffy chick lit, and not dark deep thriller).

The 7 year old and I are reading this book together...

I absolutely LOVE Beverly Cleary.  I think she's a fabulous author, and the 7 year old seems to like this one too.  I read the pages on the left and he reads the pages on the right!!

So what else have I been up to... a little bit of this (although not as much as I should do)...
 quite a bit of this...
 and this...
 a bit of this, although the 7 year old says I don't know how to build with K'nex very well, so maybe I should just let him do it!!
 and yes, I have renewed my relationship with this guy...
While cleaning out the guestroom closet, I found this guy that I had made when I was still a consultant for Uppercase Living...
 so I hung him up here (this would be the boys' bathroom...
And lastly, I finally got my kitchen put back in order, and I've had a ton of people asking to see pictures of the completed project so here you go...
I love it!  I think it's beautiful!  So that's what I've been up to lately!  I will try not to make it so long before I post again!!  Thanks for reading!!