Monday, March 19, 2012

Toy, Puzzle, Game Giveaway (For Real!)!! Part 2!!

So, the first post went well, there's only 1 item left.  Here is part 2 with the next 10 items... same rules as before (Giveaway rules).

On these pictures, I put my phone in there just to give you an idea of size.  The phone is a standard Iphone (but it is not a part of the giveaway!!)

Just let me know what you want!!!!

 Item 7) Road Rippers Plastic 4x4 truck
 Item 8) Mega Blocks plastic Dump Truck with Driver.
 Item 9) Ryan's Room wooden Fire Truck (Ladder is removable and the "trunk" opens.
 Item 10) Fisher Price Little People Dump Truck with Scoop (comes with driver and 3 "rocks"
 Item 11) Tonka Plastic Fire Truck
Item 12) Fisher Price Fire Truck (comes with driver, ladder moves up and down and swivels 360 degrees)
 Item 13) Little Tykes Dump Truck (dumper dumps, and back flap swings open and closed)
 Item 14) Mega Blocks Scoop Truck (comes with driver, scoop moves)

Item 15) Pictured open and closed.  Thomas the Train carrying case.
Item 16) Imaginarium Wooden Blocks (comes with all the blocks pictured and container with lid.  Originally there were 150 blocks, but I can just about guarantee that not all of them are there, but I'm not counting!!)


**Crossed out items have been claimed!!!

I'm giving away toys, puzzles, and games!!! (For Real)!!!

, the boys and I have been cleaning out the basement for our Spring Break project!  I have thrown away all the broken toys, but am left with a TON of toys that are still in fabulous shape that I want to share (or give) to you... yeah, you!!

Here are the rules...
1.  I will post the items and pictures on blog posts (like this)!

2.  If you can come to my house and pick up the item before April 9th, it is yours... 100% FREE!!!!

3.  If you want me to ship it (because you live far away or you cannot get to Olathe before April 9th), I ask that you pay shipping (actual shipping cost and I will ship the cheapest option) plus $2... to cover boxes, gas to the post office, etc.  I will ship anywhere!!!

4.  If there is an item you want to claim, please email me at jfmick (at) gmail (dot) com and let me know what you want and I will update the posts as often as I can.

5.  If you have any questions (such as how much shipping will cost) just let me know (I have a postal calculator so I can give you the amount before you give a definite yes or no)!

6.  Anything not claimed, picked up, or paid for by April 9th will be packed up and donated.

Here are the first few items, remember you can click on the picture to zoom in!

 Item 1) Fisher Price Shape Sorter and Shapes
 Item 2) Brain Quest 300 Questions/Answers for ages 3-4.
 Item 3) Discovery Toys Progressive Puzzles... the first column puzzles have 4 pieces each, the second column have 6 pieces each, the last column have 9 pieces each.  Comes with cardboard carrying case.
 Item 4) Melissa & Doug Wooden Magnetic Tow-Away Zone Game/Puzzle.  Comes with tow truck connected by string to a magnet to pull out car pieces.
 Item 5) Circo brand Wooden Alphabet Puzzle
Item 6) 50 Piece Dinosauria T. Rex shaped puzzle


That's all for right this minute, but there are very many more!!!


EDITED::  Crossed out items have been claimed!!  Thanks!!

Sunday, March 18, 2012

What have I been doing (recipe edition)... Mall pretzels!!!

So, if you are one of my facebook friends the you might have read my status on Monday where I was so excited that my husband suggested that since it was Spring Break and we weren't going anywhere, that we should eat out every night and let the boys take turns picking where we went... I was soooo excited!!!

Don't get me wrong, I LOVE to cook and bake, but I really like cooking and baking what I want when I want, which doesn't happen very often!!

A while back ago, I pinned (on Pinterest) a recipe for Mall Pretzels... Mall pretzel recipe.  The original recipe is on Allrecipes.com.

Let me tell you, they are fabulous!!!!!!!!  The boys said they are the best things I have ever cooked!!  I just made them into rods, I'm not coordinated enough to make the fancy pretzel shapes.  I also just brushed them with melted butter, I did not add any salt, or cinnamon or garlic or anything, although I think I may keep this recipe around to use for breadsticks!!  It's super easy (especially if you have a mixer with a dough hook to do the kneading for you!)!

These pretzels were soft and chewy on the inside and firm on the outside... just perfect!

Here is the recipe if you are interested...

Ingredients

  • 1 (.25 ounce) package active dry yeast
  • 2 tablespoons brown sugar
  • 1 1/8 teaspoons salt
  • 1 1/2 cups warm water (110 degrees F/45 degrees C)
  • 3 cups all-purpose flour
  • 1 cup bread flour
  • 2 cups warm water (110 degrees F/45 degrees C)
  • 2 tablespoons baking soda
  • 2 tablespoons butter, melted
  • 2 tablespoons coarse kosher salt

Directions

  1. In a large mixing bowl, dissolve the yeast, brown sugar and salt in 1 1/2 cups warm water. Stir in flour, and knead dough on a floured surface until smooth and elastic, about 8 minutes. Place in a greased bowl, and turn to coat the surface. Cover, and let rise for one hour.
  2. Combine 2 cups warm water and baking soda in an 8 inch square pan. Line 6 baking sheets with parchment paper.
  3. After dough has risen, cut into 12 pieces. Roll each piece into a 3 foot rope, pencil thin or thinner. Twist into a pretzel shape, and dip into the baking soda solution. Place onto parchment covered baking sheets, and let rise 15 to 20 minutes.
  4. Preheat an oven to 450 degrees F (230 degrees C).
  5. Bake in the preheated oven for 8 to 10 minutes, or until golden brown. Brush with melted butter, and sprinkle with coarse salt, garlic salt or cinnamon sugar.

Source: http://allrecipes.com/recipe/mall-pretzels/

Friday, March 16, 2012

What have I been doing (reading edition)... Endless Night

And no, this is not a romance novel (even though the title sure does sound like one!!).  I don't read romance novels!!

When I was in middle school, I LOVED reading Agatha Christie novels.  I think she is one of the best mystery writers ever, and I honestly thought I had read all her books.  A while ago, I saw someone review this book on a blog (I can't remember who, if you know or if it's you, let me know so I can post the source), and I thought I don't think I've read this book!

I borrowed it from the library and once again Agatha Christie managed to write a fabulous book!!  There is a major twist in this book, I even had to go back and re-read a chapter to make sure I read it right, but that's all I'm going to say!!!  Highly recommend this book!!

Thursday, March 15, 2012

What have I been doing (Decorating edition)... dots and M in the living room!!!

I have had a couple people ask me if I made this "picture" or if I bought this... and of course, I made it!!  And I will tell you how... I took pictures at each step, but for some reasons only the first couple pictures showed up... I have no idea where the other pictures are!!!

The board is a wooden plaque with rounded edges that is sold by Uppercase Living.  It is a raw wood plaque and I picked up my best friend Oil Rubbed Bronze spray paint and spray painted that plaque and a wooden "M" that I bought at Hobby Lobby a long time ago.  While those were drying I took my Stampin' Up! 1-3/4" circle punch and punched out 10 circles of about 10 different designs of scrapbook paper.  Then I took my second best friend spray adhesive and started applying circles to the plaque.  I tried not to have any of the same design right next to each other...

After I let the circles dry, I used my "durable steel construction" straight edge and an exacto knife to cut the excess edges off...
Now here is where the pictures disappear so you have to use your imagination... I liked the way it looked with one layer of circles, but there was a lot of the oil rubbed bronze color coming out between the circles so the "M" having the same color didn't really pop.  So I decided to put another layer of circles covering the little triangles in between the circles (does that even make sense?!?!)

After I finished applying a whole lot of circles, I let the spray adhesive dry, then trimmed the excess edges again, then I applied a layer of matte Mod Podge over the circles.  After it dried, I used E6000 adhesive to apply the wooden "M".  

I LOVE it!!!!

What have I been doing (reading edition)... Sea Escape

I just finished reading this book Sea Escape by Lynne Griffin (although my copy didn't have a seashell on the front, it had a needle and thread, but it's the same book)

Sea Escape is a pretty good book, I have to say.  Not necessarily a chick lit book, but it does deal with a mother/daughter relationship throughout the entire book.  I'm not sure if any males would like this book, but I think most females would enjoy it!!

Wednesday, March 14, 2012

What have I been doing (decorating edition)... dots in the bathroom, don't mind if I do!!

So (have you noticed I start almost every post with the word "so"... I didn't but somebody pointed that out to me the other day, I don't know why I do it, it just happens that way!!)

So, in the boys' bathroom, we have this little cabinet/shelf thingy that we bought like a million years ago at Target that hangs over the toilet.  It works perfectly to hold this and that and some toilet paper.  It has always bothered me that the doors are made of clear glass because you can see everything in there... see...

Well the other day I decided I just couldn't take it any longer, I had to do something to cover up the boys' "beauty products".  So I set out to the fabric store and the craft store and the other craft store and then to Target, and still couldn't find ANYTHING to work.  So I ventured down to the basement to my collection of scrapbooking supplies and lo and behold I found some old Stampin' Up! paper that matched the shower curtain and wall colors PERFECTLY!!

I took the glass out of the doors and just used a standard spray adhesive that said that it would adhere glass and paper and adhered the paper, then used an exacto blade to trim off the excess then slapped the glass back in place.  
I LOVE IT!!!  It looks very cool!  And better than that... it was FREE!!!

Tuesday, March 13, 2012

What have I been doing (decorating edition)... wall gallery!!!

So this is one of the walls of our living room.  It is LONG and BLANK!! The wall across the room is a wall of almost all windows so I needed something BIG to fill this wall.  (As a side note, please excuse the mess on the side table and the ottoman (I took this picture on a weekend where the hubby was working from home so that's all his stuff spread all over!)) <-- I think I have a parentheses problem!!  Anyway back to the wall...

I searched high and I searched low for a LARGE wall gallery that would work there.  After A LOT of searching and pinning, I finally found this gallery wall idea from (of all places) the HP website.

So I went through all of the old frames and pictures and mirrors, etc. that I had laying around and came up with as similar in size as I could to this gallery wall drawing.  I measured each frame, picture, etc. as well as the wall and using my Type A personality traits I created a graph so I could lay out everything and make sure it all fit...

Then I laid out all the frames, etc. on the floor and as you can see in the picture below, they are all of different finishes, so I grabbed my Rustoleum Oil Rubbed Bronze Spray Paint and went to town spraypainting all the frames to match so they would all coordinate.

Then I drew all the shapes of the frames, etc. onto some old packing paper that I had and taped it all up on the wall to see what it would look like...

And here is the finished project...  I absolutely LOVE it!  I just need to paint the vent the same color as the wall so it will blend in and not stick out!
I apologize for the horrible picture, remember on the opposite wall is a wall of windows so the light shines directly in and it created glares on a lot of the pictures, but trust me, it looks good!!!

Monday, March 12, 2012

What have I been doing (home improvement/decorating edition)... 1/2 bathroom fixtures

So you may remember on an earlier post, I talked about painting our 1/2 bathroom a soft gray color and spray painting some accessories and picture frames in an oil rubbed bronze color.  I got all the accessories put in and it looked fabulous with one exception...

In case you are not familiar with what that "lovely" thing is... it is a builder's grade faucet in shiny chrome from the very early 2000's.  I decided to change that bad boy out.  This makes the 5th faucet I have replaced and honestly, this is one of the easiest home improvement projects that ANYONE can do!!  I did take step-by-step pictures, but somehow they are gone off my camera, so you don't get instructions.  I apologize!!!!

Everything you need comes with faucet in the box... even very nice and easy to follow instructions!!

The first step (after turning off the water to the faucet obviously!) is to remove the old faucet.  Now just be ready!!  If you are at all like me and have lived in your home for 10 years and have a 7 year old boy and a 4 year old boy and this is the bathroom that they always use to wash their hands when they come in after playing, it will be yucky... like this...

Do you see that dirt ring??  Gross!!  Here's what it looks like after being scrubbed with Clorox wipes...
 Much better!!!

And here is the after picture with some of the spray painted accessories (they both used to be shiny chrome).
LOVE IT!!!!

Then I had to change out the hinges and the handles for the vanity... here are the old ones...

and here's the after...


**Sorry these are not the best pictures... the bathroom is TINY and there is no window anywhere close so the lighting is just horrible!!!

What have I been doing (decorating edition)... hooks and more hooks!!

Ok, so there are some background things you need to know before I jump into the hook projects!!

1) I used to be an Uppercase Living consultant.  Right before I ended my consultant-ship (is that a word?!?!?) I went through and bought a whole bunch of random vinyl sayings and other things with my discount that I thought I might someday put up.  Let's just say I have a ton of vinyl, if I wanted to cover my whole house in vinyl, it's possible I have plenty!!!

2) I lose my car keys on an almost daily basis, usually when we are running late to get my 7 year old to school.  I just throw them down on the cabinet beside my purse and without fail they get lost!  I once had to have my neighbor pick up my 4 year old at preschool because I had lost my keys only to find them in the silverware drawer about 5 minutes after she dropped him off.  The drawer must have been opened and they must have fallen in... I don't know!!!! We have lived in our house for 10 years and this has been going on for 10 years!!

3) My husband believes that I am incapable of hanging his dress shirts up properly!  He buys the wrinkle-free ones because it's possible that I refuse to iron for him, but the problem with the wrinkle-free is that you have to take them directly from the drawer and hang them up "the right way" (which I apparently haven't learned in my 34 years on Earth)!  In the 10 years, we have lived in this house, every week while doing laundry I've said, "I really should put some hooks in here to hang the hubby's shirts on as soon as I pull them out of the dryer!"

Can you see where I'm going with all this?!?!?  I bet so!!!!

 These are the hooks I bought at Target... they are even called a key rail!  How awesome is that????
 And here is the key rail hanging on the wall right beside the entrance to the garage... notice my keys on the far right hook?!?!?


Then I looked through all my vinyl (and I'm not talking my record collection!!) and found this one which just totally cracks me up... yes I have THAT kind of sense of humor!!

Then I found this little plaque thing that comes with 4 hooks (all also from Uppercase Living)! And I did the whole vinyl application and came up with this...

And here it is hanging up in my itsy-bitsy teeny-tiny laundry room!  I love it!  I snicker everytime I walk into the laundry room!!

And here it is right after I did my laundry for the week... serving their purpose!!!

Sunday, March 11, 2012

What have I been doing (reading edition)... 3/11/12

In the past couple of days, I have had 2 people ask me when I plan to blog again!  I apologize that it's been a while, I truly didn't know that anyone besides my mom and sister read my blog!!  Well, I'm back... and this one's for you Angel!!!

I'm going to try and figure out all the books I've read since my last post about reading and list them in the order that I liked them... if you have any specific questions about any of them, just let me know!!

- The Litigators by John Grisham (I love all his books!!)

- Animal, Vegetable, Miracle by Barbara Kingsolver

- The Irresistible Henry House by Liga Grunwald

- A Cup of Tea by Amy Ephron

- The Buffalo Soldier by Chris Bohjalian

- Blessed Child by Ted Dekker

- Domestic Violets by Matthew Norman

They were all good books, the last one was just a little slow and the second-to-last one took a little while to get into, but was really good once I got into it.  There are probably a couple other ones, but I can't remember which ones, so we will just go with this for now!!

Like I said previously, please let me know if you have any general or even specific questions about these books!!

Friday, February 24, 2012

What have I been doing (cooking edition)...2/24/12...

Sorry I've been gone so long... in the middle of a bunch of fun projects, so I plan to be posting quite a bit in the next couple days...

I did try a new recipe last night (although I didn't get any pictures so you will have to just imagine it)...  The recipe is Pork Chops Marsala, and I found it right here on Cooking Light.com (it is one of the many recipes I pinned on Pinterest).

Those that know me really well, know that I don't eat red meat, and contrary to what commercials would have you believe pork is really not the other white meat, but I figured that all mixed in with the marsala sauce I could just pretend that it was chicken... it sorta worked!!

We found this recipe as written, kind of -meh-.  After I type the recipe, I will add some things that I will change if I ever make it again, so you might want to read those too!!

Pork Chop Marsala
Yields: 4 servings (serving size 1 pork chop and 1/2 cup sauce)

Ingredients:
6 tbsp all-purpose flour, divided
4 (4 oz) boneless center-cut loin pork chops (about 1/2 inch thick)
Cooking spray
1/3 cup minced shallots (about 2)
2 teaspoons minced garlic
1 (8 ounce) package presliced mushrooms
2 tsp chopped fresh thyme
1 cup fat-free, less-sodium chicken broth
1/4 cup Marsala wine or dry sherry
1/4 tsp salt
1/4 tsp black pepper

Preparation:
Heat a large skillet over medium-high heat.  Place 1/4 cup flour in a shallow dish.  Dredge pork in flour. Coat pan with cooking spray.  Add pork to pan; cook 4 minutes on each side or until browned.  Remove pork from pan.

Add shallots, garlic, and mushrooms to pan; saute 3 minutes or until moisture evaporates.  Add remaining 2 tbsp flour and thyme to pan, and cook for 1 minute stirring well.  Combine chicken broth and marsala, stirring until smooth.  Gradually add broth mixture to pan, stirring constantly with a whisk; bring to a boil.  Reduce heat and simmer 2 minutes or until sauce thickens.

Return pork to pan; cook 2 minutes or until desired degree of doneness, turning to coat.  Sprinkle with salt and pepper.

* This is a really easy dish to make, so I was disappointed that there wasn't much taste at all!!  If I were to try this again, this is what I would change...

-double the amount of shallots to 2/3 cup
-double the amount of garlic to 4 tsp
- half the amount of thyme to 1 tsp
- double the amount of marsala wine to 1/2 cup (you will need to increase the cooking time if you increase the liquid amount in order to burn off the alcohol).

I think by doing all these things, the flavor would be increased and it would be a fabulous recipe!!!!!

Monday, February 13, 2012

What I did this weekend...

It's been a while since I blogged, but I'm still here, I just haven't really had anything fun and/or creative to blog about.

The hubby and I went to Las Vegas last week to celebrate his brother's 40th birthday.  We went with 3 other couples.  It was a good time!

So last week, I spent pretty much the whole week just getting the house back in order, the laundry all done, and then the boys were out of school Thurs and Fri for conferences, so we did a few fun things those days.

This weekend, the 7 year old had a 9:00 basketball game, then my mom and I went to the KC Home Remodeling and the Lawn and Garden show at the American Royal.  Then on Sunday, I did laundry, cleaned up, went to a 31 party, went grocery shopping, then watched the Grammys!

I'm sure you all feel so honored to have a run-down of my weekends!  Today's plan is to clean the bathrooms, vacuum the house and then if there's time work on some fun creative projects... I will post later if I get anything done!

Wednesday, February 1, 2012

Candlestick-y things...

So my neighbor used to be a consultant for Southern Living at Home.  She recently decided to end her consultant-ship (is that a word?), and was selling off all her inventory on hand at rock-bottom prices, so I bought a few things from her like two of these candlestick-y things...
 
 So, when I got them from my neighbor, I really liked the color, but then I placed them in my living room and I decided I didn't really like the color anymore.  So, I decided to spray paint them!!  The glass "jar" part is permanently attached to to the base.  Step 1: tape off the glass so no paint gets on it...
 Next: Cover the top of the glass with wax paper and tape it down securely so paint won't get inside the "jar".
The next step is to sand off all the current paint and rough up the base so the spray paint will stick to it... in this picture you can see the difference... the one on the left has been sanded, the one on the right has not yet been sanded...
The next step is to spraypaint... my only question was, "what color?"  I debated for a long time and then because our living room is a pretty dark grayish-green and our furniture is chocolate brown, and we have a white fireplace and white trim and white blinds...
So I decided to paint them white to bring some of the white off the walls into the center of the room...
 I used Rustoleum White Satin and a Rustoleum Matte Clear coat.
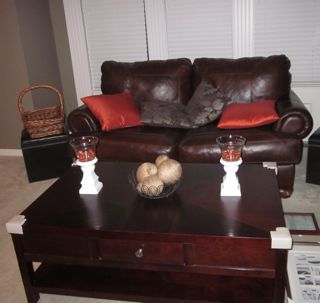
I decided to fill it with some orange-y pebbles that I had stored in my guestroom closet until last week!!  I will probably also get some candles to go in there too, but I didn't have any of those laying around...
 Here's what they look like on the coffee table in front of the love seat!  I LUVVVV them!!!